http://weblogs.asp.net/dwahlin/archive/2012/09/30/getting-started-building-windows-8-store-apps-with-xaml-c.aspx
기술은 참 재미있죠? 여러분들이 새로운 기술이 어떠한 방향으로 가고 있는지 알았다고 생각할때 새로운 다른 어떤 기술들이 새로 나오고 여러가지를 변화시키고 또 새로운 기회를 부여합니다. 최근에 제가 접한 접하고 많이 시간은 투자한 기술은 Windows sotre application입니다. 2011년 BUILD 컨퍼런스때 저는 Windows 8 에 대한 저의 생각을 포스트했었습니다. 지금도 그때의 컨퍼런스 즐거움을 느끼고 있습니다.현실로 다가 옵니다. 시간은 이 제품이 얼마나 소비자한테 사랑받았는지 알려줍니다. 하지만 그러한것들은 다 떨쳐 버리십시오.
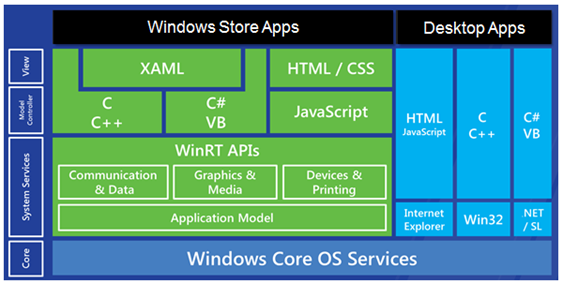
나는 현재 두 Windows 8 store application 컨셉을 가지고 있는데 하나는 XAML/C#으로 만드는거고 하나는 HTML/JavaScript로 만드는 것입니다. 나는 MS에서 두가지의 옵션들을 제공하는것에 감사합니다.이러한 두가지 옵션때문에 Desktop개발지이건 웹 개발자이건 상관없이 쉽게 개발이 가능합니다. 여기서 잠시 간단하게 Windows 8의 구성된 기술들에 대해 보겠습니다.
이 포스트에서 나는 Windows 8 store XAML/C# app들의 기능,파일들, Visual Studio에서 제공되는 코드들을 살피며 기초에 포커스 할것입니다. 이러한 App를 개발하기 위해서는 XAML과 C#의 지식이 좀 필요합니다. Visual Studio 2012에서 제공하는 Windows 8 store 프로젝트를 시작해 봅시다.
Windows 8 Store XAML/C# Project Types
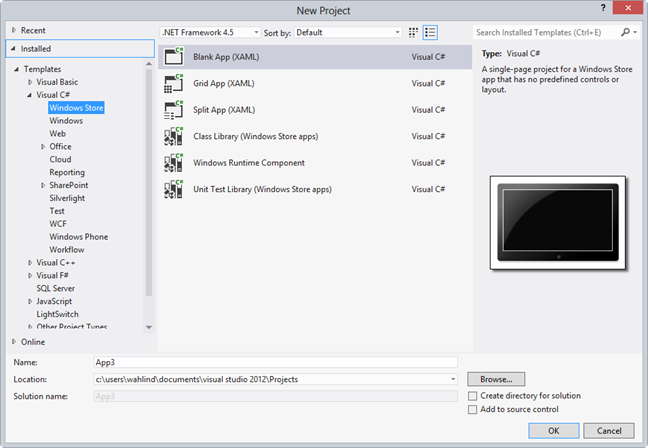
Visual Studio 2012를 열면 여러분은 Visual C#아래 Windows Store라는 새로운 템플릿을 보게 될것입니다. 여기에는 6개의 다른 프로젝트 타입이 다음과 같이 보입니다..
The Blank App project는 기본적인 코드와 싱클페이지를 제공합니다. 반면 Grid App와 Split App 템플릿은 보다많은 코드와 여러분의 application을 위해 많은 페이지들을 제공해 줍니다. 다른 프로젝트들은 Windows 8 store app에서 구동되는 클래스 라이브러리를 만드는데 사용될수 있고 WinRT component를 만드는데 unit text를 하는데 필요한 프로젝트를 만들수 있습니다.
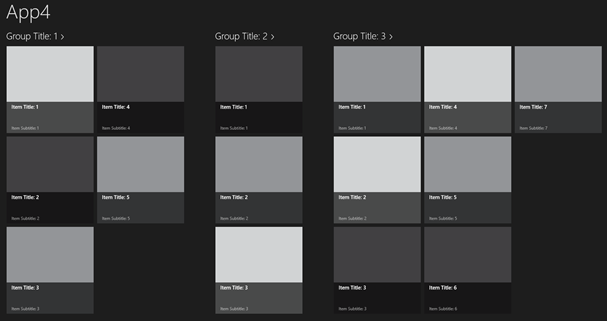
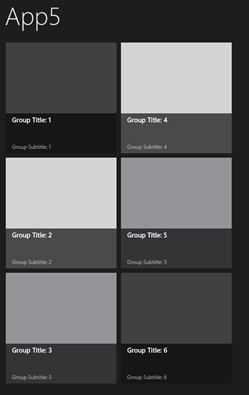
만약 여러분이 tile 컨셉의 app를 만들고자 한다면 Grid App또는 Split App 템플릿은 시작하기에 좋은 프로젝트가 될것입니다. 처음의 화면에서 생성된 각 프로젝트의 처음 화면은 다음과 같을 것입니다.:
Grid App
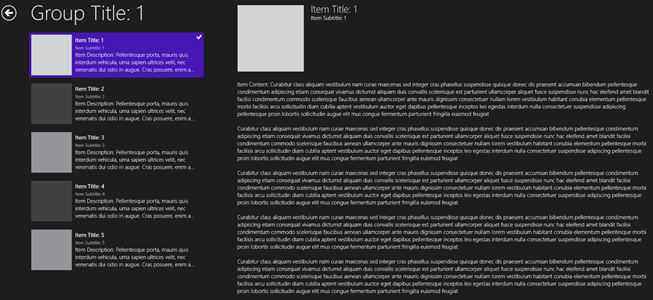
Split View App
유저가 Grid App에 타일을 클릭하면 타일의 상세 데이터들을 볼수 있다. Split View App에서는 그룹들과 카테고리들이 보여지고 유저가 어떤 그룹과 카테고리를 클릭했을때 그룹에 속한 여러 아이템 리시트를 볼수있고 그 아이템의 상세정보를 볼수 있다.:
이포스트에 나머지 부부으로 Blank App 프로젝트가 제공하는 기능에 포커싱하겠다. 왜냐하면 Blank App 프로젝트는 Windows 8 store app를 배우기에 매우 쉽고 간단한 방법을 제시하기 때문이다.
Blank App Project 형태
Blank App 프로젝트는 간단하고 기본에 충실하게 하는 시작하기에 훌륭한 장소이다. 이 포스트에서는 Blank App 프로젝트가 여러분에게 어떠한 것들을 제공하고 또 다음 포스트에서는 추가적인 상세 사항들을 다룰것이다. 만약 여러분들 중에 다른 프로젝트 타입에 관심있으시면 이 포스트를 건너뛰어라..
The Blank App project template은 그 의미와 같이 empty 프로젝트와 함께 도움이 될만한 간단한 파일만 추가 되어있다. 이 프로젝트템플릿은 많인 windows 8 store app가 따르는 grid layout view에 맞지 않는 app를 개발하는데 적합하다. 나는 현재 진행하고 있는 app Balnk App project template를 선택하였다. 왜냐면 Grid App project처럼 image/data 타일형이이 아니기 때문이다.
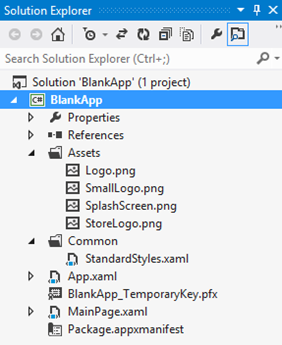
Blank App project는 타일을 위한 이미지들 splash screen(여러분은 분명 이러한것들을 변경하고 싶을 겁니다.), StandardStyles.xaml(AppBar를 위한 버튼의 스타일들), App.xaml파일, app의 메인페이지인 MainPage.xaml을 제공합니다. 또한 app에서 필요한 기능들 store에 사용될 app정보들 기타 등등을 정의한 appxmanifest를 페키지에 추가합니다.
The App.xaml, App.xaml.cs and StandardStyles.xaml Files
App.xaml 파일은 StandardStyles.xaml을 로딩하는 역할을 합니다. 이 StandardStyle.xaml은 application 전반에 걸친 여러가지 리소스들을 담고 있습니다.:
<Application
    x:Class="BlankApp.App"
    xmlns="http://schemas.microsoft.com/winfx/2006/xaml/presentation"
    xmlns:x="http://schemas.microsoft.com/winfx/2006/xaml"
    xmlns:local="using:BlankApp">

    <Application.Resources>
        <ResourceDictionary>
            <ResourceDictionary.MergedDictionaries>

                <!--
                    Styles that define common aspects of the platform look and feel
                    Required by Visual Studio project and item templates
                 -->
                <ResourceDictionary Source="Common/StandardStyles.xaml"/>
            </ResourceDictionary.MergedDictionaries>

        </ResourceDictionary>
    </Application.Resources>
</Application>
StandardStyles.xaml는 다른 텍스트 스타일과 AppBar 버튼들이 정의 스타일을 가지고 있습니다. 여러분들이 스크롤을 내려 가운데쯤을 보면 edit icon을 위한 AppBar버튼 스타일이 있는것을 볼수 있습니다. 이러한 버튼 스타일은 빠르고 쉽게 여러분의 application에 추가할수 있습니다.
<Style x:Key="EditAppBarButtonStyle" TargetType="ButtonBase" BasedOn="{StaticResource AppBarButtonStyle}"> <Setter Property="AutomationProperties.AutomationId" Value="EditAppBarButton"/> <Setter Property="AutomationProperties.Name" Value="Edit"/> <Setter Property="Content" Value=""/> </Style>
App.xaml.cs로 가보면, 이 파링른 여러분이 시작하기 쉽게 코드들을 포함하고 있습니다. OnLaunched() method는 Frame생성을 처리하기 위해 추가되었고 이 Frame은 MainPage.xaml과 같은 자식 페이지를 로드하기 위해 쓰입니다. Frame은 WPF와 Silverlight application과 같은 의도로 만들어 져 있습니다. 이러한 Frame은 application에서 페이지를 이동하는되 사용 됩니다.
/// <summary>
/// Invoked when the application is launched normally by the end user.  Other entry points
/// will be used when the application is launched to open a specific file, to display
/// search results, and so forth.
/// </summary>
/// <param name="args">Details about the launch request and process.</param>
protected override void OnLaunched(LaunchActivatedEventArgs args)
{
    Frame rootFrame = Window.Current.Content as Frame;

    // Do not repeat app initialization when the Window already has content,
    // just ensure that the window is active
    if (rootFrame == null)
    {
        // Create a Frame to act as the navigation context and navigate to the first page
        rootFrame = new Frame();

        if (args.PreviousExecutionState == ApplicationExecutionState.Terminated)
        {
            //TODO: Load state from previously suspended application
        }

        // Place the frame in the current Window
        Window.Current.Content = rootFrame;
    }

    if (rootFrame.Content == null)
    {
        // When the navigation stack isn't restored navigate to the first page,
        // configuring the new page by passing required information as a navigation
        // parameter
        if (!rootFrame.Navigate(typeof(MainPage), args.Arguments))
        {
            throw new Exception("Failed to create initial page");
        }
    }
    // Ensure the current window is active
    Window.Current.Activate();
}
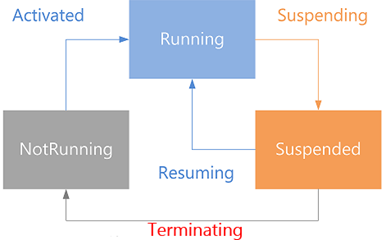
위의 코드에서 application이 다시 시잘 될때 Frame을 생성하는것뿐만 아니라 이전에 app가 terminate 됐는지를 체크해서 여러분이 유저가 필요로 하는 어떠한 데이터를 로드할 수 있다. 여러분들이 Windows 8 store app lifecycle에 초보자라면 다음 이미지를 어떻게 app가 구동되고 중지되고 terminate되는지 알수 있다.
만약 사용자가 app를 스위칭하면 돌아가고 있던 app는 메모리에서 홀딩상태에 있습니다. app는 메모리 용량에 따라 쭉 중지상태에 있을수 있고 terminate될수도 있습니다. OS가 필요하면 내버려두고 아니면 terminate시킵니다. 비록 여기서 application의 상태 저장에 대해서 다루지 않지만 여러분은 추가 정보를 다음 url에서 찾을 수 있습니다. http://msdn.microsoft.com/en-us/library/windows/apps/xaml/hh465099.aspx.
다른 메서드 중에 OnSuspending() 또한 유저가 다른 application으로 스위칭할때 상태값을 저장할수 있습니다.
/// <summary>
/// Invoked when application execution is being suspended.  Application state is saved
/// without knowing whether the application will be terminated or resumed with the contents
/// of memory still intact.
/// </summary>
/// <param name="sender">The source of the suspend request.</param>
/// <param name="e">Details about the suspend request.</param>
private void OnSuspending(object sender, SuspendingEventArgs e)
{
    var deferral = e.SuspendingOperation.GetDeferral();
    //TODO: Save application state and stop any background activity
    deferral.Complete();
}
The MainPage.xaml and MainPage.xaml.cs Files
Blank App project는 MainPage.xaml파일을 추가하는데 이 파일은 application의 초기 화면입니다. 이 파일은 <Grid> Xaml 요소에 아무것도 없습니다. MainPage.xaml.cs는 생성자함수와 OnNavigatedTo()메서드를 포함하고 이 메서드는 프레임에서 페이지가 표시될 때 한번 호출 됩니다.
/// <summary>
/// An empty page that can be used on its own or navigated to within a Frame.
/// </summary>
public sealed partial class MainPage : Page
{
    public MainPage()
    {
        this.InitializeComponent();
    }

    /// <summary>
    /// Invoked when this page is about to be displayed in a Frame.
    /// </summary>
    /// <param name="e">Event data that describes how this page was reached.  The Parameter
    /// property is typically used to configure the page.</param>
    protected override void OnNavigatedTo(NavigationEventArgs e)
    {
    }
}
여러분들이 XAML에 경험이 있다면 여러분은 Design mode로 스위칭해서 Visual Studio의 툴박스의 컨트롤을 Drag and Drop을 하실 수 있습니다. 여러분이 만약 XAML코드를 타입하길 선호하신다면 XAML 에디터에서 하시면 됩니다. WPF와 Silverlight에서 포함된 Canvas,Grid,StackPanel과 같은 layout 컨트롤들이 포함되어있고 표준 input 컨트롤들 즉 TextBox, CheckBox, PasswordBox, RadioBox등과 같은 컨트롤들도 포함되어 있습니다. MediaElement는 Video또는 audio파일들을 렌더링하기 위해 사용됩니다. 일발적인 XAML 컨트롤들은 아래와 같습니다.
비록 XAML/C# Windows 8 store apps가 Siliverlight 5의 모든 기능들을 포함하고 있지 않지만 store app들을 개발하기 위한 핵심 기능들이 오픈소스 프로젝트로 나와 있습니다.(Callisto, Tim Heuer,Q42.WinRT) . 표준 XAML 데이터 바인딩은 C# 객체들을 컨트롤러에 바인딩 할수 있습니다. converter들은 data binding 과정동안 data를 조작할수 있게 해줍니다. 그리고 custom 스타일과 템플릿들은 컨트롤러에 적용될수있습니다. Visual Studio 2012가 비록 외적으로 스타일과 템플릿을 지원하지 않지만 Expression Blend 5는 지원해 줍니다.
Windows 8 app 초기화면 개발에 여러분들은 앞에서 언급한 컨트롤들을 추가할수있습니다. 간단하게 <Grid>요소에 컨트롤들을 넣으십시오. 여러분들은 StackPanel 컨트롤을 사용하여 다른 기본컨트롤들을 정렬할수 있습니다. 그리고 Boarder 컨트롤을 사용하여 컨트롤들의 주변 boarder를 추가하고 Grid 컨트롤을 사용하여 컬럼안에 기본 컨트롤을 정렬하고 Canvas컨트롤을 사용하여 절대 위치에 컨트롤을 배치할수 있습니다.
여러분이 새롭게 느낄만한 컨트롤중에 하나가 APPBar가 있다. 이 것은 store app에 menu/toolbar기능을 추가할때 사용된다. 그래서 앱을 보다 깔끔하게 집중할수 있게 해준다. 여러분은 이러한 AppBar을 화면 하단 또는 상단에 위치시킬수 있다. AppBardp에 edit button이 있는 예제는아래와 같다. EditAppBarButtonStyle은 StandardStyles.xaml파일에서 정의되어 어디서나 사용 가능하다.
<Page.BottomAppBar>
    <AppBar x:Name="ApplicationAppBar" Padding="10,0,10,0" AutomationProperties.Name="Bottom App Bar">
        <Grid>
            <StackPanel x:Name="RightPanel" Orientation="Horizontal" Grid.Column="1" HorizontalAlignment="Right">
                <Button x:Name="Edit" Style="{StaticResource EditAppBarButtonStyle}" Tag="Edit" />
            </StackPanel>
        </Grid>
    </AppBar>
</Page.BottomAppBar>
표준 XAML컨트롤들과 같이 AppBar에 <Button>컨트롤은 이번트 핸들러를 MainPage.Xaml.cs파일 또는 ViewModel (만약 여러분의 app가 MVVM패턴을 상용한다면)객체에 가질수 있다. AppBar는 다른 화면으로 네비게이션할수있게 해주고 컨트롤을 보여주고 다일러그를 보여주고 화면 셋팅등등을 할수 있게 해준다.
The Package.appxmanifest File
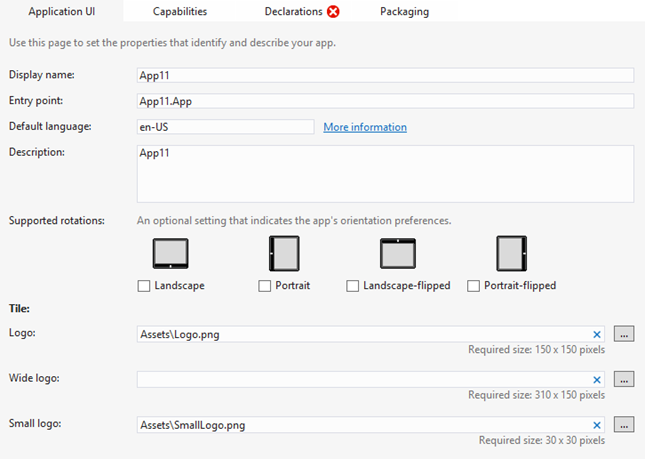
Package.appxmanifest파일은 Windows 8 store app에대한 상세 설정을 포함하고 있다. Visual Studio에서 더블클릭으로 splash 스크린 이미지, 타일을 위한 작고 넓은 이미지, 기본정보 등등을 정의할수 있다.
Summary
여러분들이 만약 XAML 기술에 경험이 있다면 쉽게 Windows 8 application을 개발할수 있을겁니다.다. Wilverlight나 WPF에서 사용하던 컨트롤들을 다시 학습하지 않고 개발할수 있습니다.
